Diary of a (mostly) DIY bathroom reno

We live in a 1940 war-time house. It was originally built to be temporary, and was pieced together in 8 x 12 pre-built chunks that are bolted together. Over the years, a lot of the house has been updated – but one area which still had most of the original elements was the bathroom.
The original claw foot tub was pretty but unpractical. It was never designed to have a shower, and the shower kits for these tubs are cheap and inefficient. We have repaired ours several times with new valves, but it has been working with a pencil jammed in it to get sufficient pressure for the last four years. The tub surround was 1/4″ press board and not designed to take the humidity. We were starting to see some water damage. There was no fan installed, so no way of getting rid of excess humidity either.
Taking on a bathroom reno is not for the light of heart, but we had some extra money and time because of cancelled travel and I decided to go for it.
As we go along I’ll give you an idea of costs – we did things on a budget and I did a lot of the work myself. It still came out much more expensive than I had expected so my advice is to make a budget and then x by 3.
I’m pretty handy but the bathroom felt outside of my comfort zone. Luckily, I have a friend who is a retired teacher and also does some contracting on the side. He agreed to help me. He helps with the hard stuff and teaches me to do the things that are in my range, then goes away and lets me putter. I pay him his daily wage when he is here, and he uses his ‘teacher voice’ to explain everything to me as he goes. It’s a great deal for me. I learned a TON. Given how much longer it took me to do things I don’t know that I saved a ton of money. I did gain all the satisfaction of having my very own hands on every project. For me, that is worth it.
Total Cost for Carpenter: $2000


I started by making a plan. My theater training kicked in and I decided to stage manage it. I was determined to get r’ done quickly – given that I was about to tear out our only bath/shower. We have another toilet and sink but we were going to be without in-house bathing (my neighbor agreed to let us use her shower).

First the fixtures came down and the old tub came out. Moving a claw foot tub is a several person job – so get a crew. I was able to sell it to a young couple who bought a fix r’ upper and are planning on refinishing it and using it. I really didn’t want this tub to go to scrap so that made my day.
I bought myself a respirator. We have no confirmed evidence of asbestos materials in the house but there must be some, and either way there was going to be A LOT of dust.

And there was, A LOT of dust. At some point our house had sprayed in insulation – and it filled the ceiling joists as well as the walls. This is the second time I have pulled down one of the ceilings (we did our kitchen about 10 years ago) and it is gross!! I layered up with safety gear and coveralls and went for it.
(We recently watched Stranger Things and it felt very reminiscent – this pictures was taken by Diego for his social media. I was briefly famous among the pre-teen crowd.)
(**Reno Reminder. Don’t forget to have a plan for garbage. I tried to throw away as little as possible but we still needed 2 sq meters. I bought one of the “container bags” from the hardware store.
Garbage removal – $250


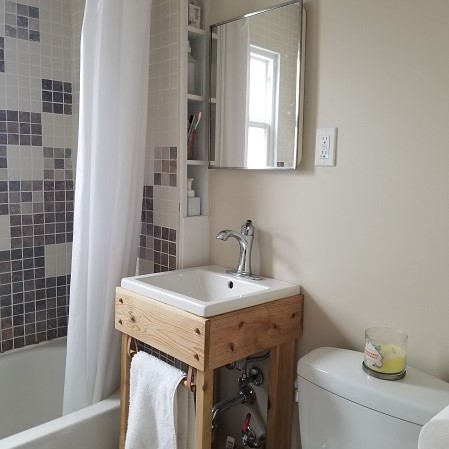
Meanwhile, between other jobs, I built a vanity. I kept my eyes open for materials in lots of different places. The space for a sink is really limited in this bathroom so I found this tiny sink at the local Habitat for Humanity Re-store. All the pre-built vanities in this size are for apartments and pretty junky. I got some cedar and built a simple table which I protected with a wax/oil finish. I tried to use as few chemicals as possible throughout the project. If you’ve been following along our adventures you know we try to limit our footprint where we can.
Sink – 90.00
Wood for the vanity, drill bit, etc. – $63
At this point the electrician came in to check the wiring for the light, install the ceiling fan and re-arrange the wiring for the baseboard to fit the new convection heater. I have a crazy good deal on electrical work – so I won’t give you my total cost – but it took him about 5 hours.
I was really glad we had him come in (it is always the safest choice to have a licensed electrician). We still have some of the old wiring and so it was a bit of a journey to get everything settled. It also highlighted the next reno job as the old wiring continues through the ceiling into my husbands office. His office, the hallway and the living room all have the original ceiling and will have to come down sooner rather than later. Maybe later. I’m not anxious to drop another 20 bags of loose insulation on my head anytime soon.
Total electrical – 5 hours – around $400


I really wanted to save the original door. We only have two of these wooden doors left in the house. This was a labour of love for sure – and took hours and hours. I mostly used the heat gun (with chemical filter for the respirator!!) but also sanded and stripped. I painted it in a white wash so the wood grain would come through. After all that work I splurged on a fancy, period recreation door nob. Which I love.
Doornob – $200
In between all of these jobs our plumber came in to disconnect the faucets, etc. One of the things that needed to be fixed was the main house shutoff which had been housed in the bathroom, crammed against a wall (you can see it in the bottom left corner of the pic). It was unsightly and old and our plumber was going to take advantage of the work to update it and move it to the crawl space. However, when the city came to shut off the water they couldn’t. The outside shut off needed to be replaced. The city pays for this so no added $$ but a two week wait to get the work done. There goes my schedule….


While we waited for the main water shut off to be moved we concentrated on the tub/shower surround. This could be done without moving the shutoff, and was the priority anyway because we have a second toilet but not a second shower. The plumber put the tub in (with a LOT of swearing about my unlevel floors) and my carpenter helped me put in the tub surround and left me to seal and tile. We used densheild (cheap) around the tub and Kurdi band (expensive!) to seal the seams. Between the two it is really tight.
I used sheep’s wool insulation in the walls that I had from another project. It was even reused. I pulled it out of the other project, washed it in the washing machine, hung it to dry and then re-installed it. You can’t do that with fiberglass!! If you get a chance to use sheep’s wool for insulation do it. It is more expensive (almost 3 times more) but if you have a small space you’re not likely to notice the difference in the whole price of the project, and it is so lovely to work with. The lanolin comes off on your hands and works like a moisturizer. The last time you insulated did your hands feel cleaner and softer afterwards? I didn’t think so.
Tub – $279
Tiles and tiling supplies – tile, tile edge, grout, sealant, float, trowel, clippers, spacer, sponge, Kurdi band, Kurdi niche – $570
Time to tile. I had already purchased some left over stone tile from someone on kijiji cheap. I mixed and matched this with cream mosaic tile that I bought new from the hardware store. I really like how it turned out, and it was one of the times I was glad to do so much of work on my own. This kind of finicky style is not something a pro is going to do without charging a premium!


I enjoyed doing the tiling. It’s not hard if you take your time and watch some good videos beforehand. It’s not going to be perfect. If you look carefully you can see some places where the tile didn’t line up correctly or I got off square. I would do a better job next time (although I don’t plan on re-redoing the bathroom any time soon!). If you’re happy with an esthetic that is a bit eclectic and homemade I say go for it. If you want spa perfect tile, hire a professional.
Once the shower was in and working (this took about 3 weeks start to finish) we had to wait for the water line to be repaired and then I slowed down a lot and took my time. I also stopped taking pictures – I just forgot. My carpenter came in and helped me level the floor. (After all the swearing from the tub install I promised the plumber the floor around the toilet would be level.) We used a self-leveler pour and it worked great. I did one day of drywall with him and two on my own. I did one day of mud/tape with him and a couple on my own. Again, once you know how, if you’re not too stressed out about perfection, it is a doable DIY.
Drywall materials – drywall sheets, mud, durabond, tools, electrical boxes, etc. – $840
Floor leveler and flooring – $170
Bathroom heater – $280
Plumber, take out the old fixtures, move the shut-off, install the tub and toilet, install new fixtures. $1500
Faucets, shower and sink – $420
Shower accessories – tension rod, fan, grab bars – $350
Paint, tools, caulking – $140
Dressing – medicine cabinet, new shower curtain, floor rug, etc – $300
Then comes all the finishing – which takes way longer than you think it is going to. Mud/taping takes lots of days because you have to let it all dry between layers. Then comes sanding, caulking, painting, trim, painting trim, installing fittings and caulking again, dressing and finishing. Lots of days. I did start to run out of steam by the end but, with a working shower, I just took my time and made sure I did at least one thing everyday.
I can see why renos could get stalled and take years. We didn’t have that luxury which is probably for the best. There were a few times when I should have taken even longer (an extra day to let things dry/set) and I can show you where there are rough bits caused by moving too fast. You have to look closely, however, and I was motivated to just keep moving forward. It is another advantage to doing the work yourself: you don’t have to wait for the contractor to come back, no weekends off, and you can just keep going.


All told the reno took just over a month and a half and cost around $8000. I worked about two weeks worth of FULL days and then a couple of hours each day after that. It felt like a long haul at the time but in retrospect didn’t seem so long. We love the new bathroom, it is bright and organized and easy to clean. The shower works beautifully. The fan sucks out all the smells and moisture and the new heater is fast and efficient. We did some forward thinking and installed grab bars and a low tub, with the hope that as we get older and/or have to house older parents we won’t have to make any changes. In truth, I use them all the time and these kind of accessibility details are a good idea for everyone.
Good luck with your future renos. I hope this story was helpful and inspiring. Let me know in the comments below how your bathroom reno experience was. I’d love to hear your stories, the good and the bad 🙂
…try new things, fix stuff, get your hands dirty, read about everything and live life the most that you possibly can while still being as kind as possible – to people and to the world around you.


Recent Comments